


Many new moms want to start exercising right after birth to quickly get back in shape and regain their overall fitness.
Here, new moms shouldn't start marathon training right away, but some simple moves can help strengthen their pelvic muscles so they can safely return to their pre-pregnancy workout routine.
This article covers the first six weeks of post-birth fitness with gentle moves so a woman can take care of her body, heal, and work toward going back to the workouts she loves.
Basic steps before starting exercise

There are some basic things a woman should check before starting to work out, These steps include:-
-
Start slow, then build up strength
Don't worry, it won't be slow forever. Women will get back to their favorite workouts quickly. The first six weeks after birth are really important to build a strong base for fitness goals later.
Also, keep in mind this time is before the doctor allows full workouts. In this critical period, a woman builds pelvic stability and floor strength, gradually doing harder exercises without leaking or hurting her back.
-
Don't overdo it
Remember, the OB might not clear full workouts until about 6 weeks after birth. So don’t jump straight into high-intensity exercises. When cleared, the plan below is the best way to start.
-
Recovery
Like all fitness plans, recovery time is just as important as effort. The woman has just gone through a lot carrying and delivering the baby. Now it's time to rest, recover as much as possible, and eat well. The body will handle the rest.
Best exercises to get fit right after birth

Here’s a 6-week plan focused on pelvic floor safety and hip/core stability. Start with one exercise in week one, add one each week for the first four weeks, then add one or two exercises in the last two weeks.
For example, in the first week, the woman will have only one exercise, "Kegel exercise", and in the second week, the "Kegel exercise" will be repeated along with the "glute bridge exercise".
By the sixth week, the woman will do about 6 to 8 exercises in each session. Also, she can walk daily, starting with 15-30 minutes, increasing the intensity and duration of the walk each week. If possible, the woman can try going for a stroll after finishing the exercise session to see if she feels more stable in her hips, core, and pelvis.
First week exercises
- Seated Kegel breathwork exercise

- How to do this exercise
-
Sit on a stable ball or soft chair so that the two bony parts of your butt and the pelvic bones and perineum rest on the ball surface.
-
Place your feet flat on the ground, just a bit wider than your hips.
-
Take a deep breath through your nose to fill your belly from all sides. Imagine a balloon in your stomach and try to fill it until it touches your ribs and hips during breathing.
-
While exhaling, purse your lips like you're blowing out candles.
-
After doing this exercise several times, focus on your pelvic floor and try to feel the space between your perineum and pelvic bones touching the ball or chair.
-
With each breath, try to fill the balloon more and more using your diaphragm.
-
While exhaling, let your shoulders and ribs relax as your belly moves toward your spine. You should feel like the perineum is holding the ball and lifting it off the ground.
-
Do this exercise every day for 3-5 minutes or until you feel tired. You might find it hard to fully contract or hold it for long.
Week Two Workouts
- Glute Bridges Exercise

In the second week, add Glute bridges to your Kegel exercises.
- How to do this exercise
-
Lie on your back with knees bent and feet flat on the floor, keeping your spine straight.
-
From this position, do a Kegel. Take a deep breath to fill your lungs, then exhale while engaging your pelvic floor and abs as you lift your hips off the ground and press them toward the ceiling.
-
Breathe in again as you lower down. Repeat.
-
Repeat this exercise 10-12 times, 1-2 times a day.
-
If you don’t feel your pelvic floor engaging, try adding a ball or Pilates cushion between your thighs. Keep pressing lightly on it during the movement.
Week 3 Exercises
- Clam Shells Exercise
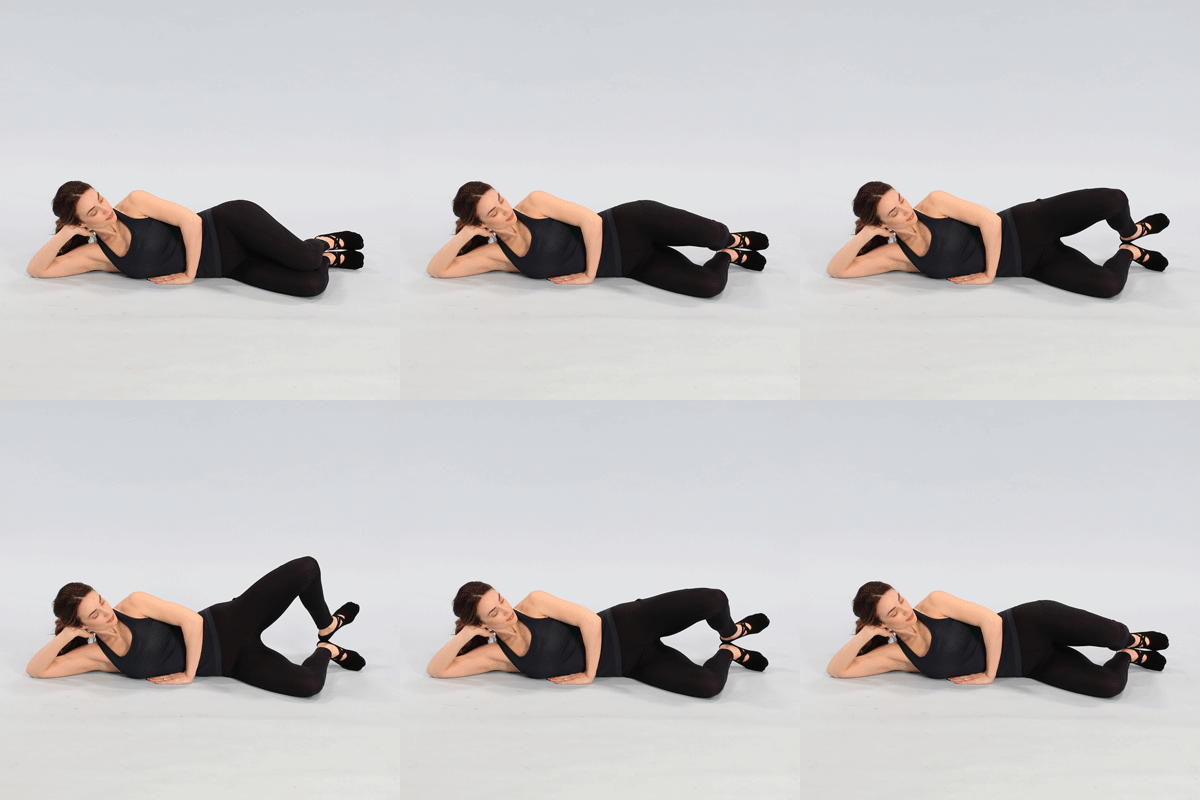
Add the Clam shells exercise to your Kegel and Glute bridges exercises, making a total of three exercises this week.
- How to do this exercise
-
Lie on your side, keep your spine straight, and bend your knees.
-
Stack your hips, knees, and ankles. Take a moment to practice the Kegel exercise from this new side-lying position.
-
Keep your heels together, lift your top knee away from the bottom knee, take a deep breath to fill your lungs, then exhale as you lower the top knee back down.
-
Repeat this exercise 10-12 times, 1-2 times a day.
Week 4 Exercises
- Side-lying chair pose exercise

In week 4, the side-lying chair pose is added along with the other exercises, making a total of four exercises at this stage. This new exercise is an advancement from the Clam shells exercise done last week, so you should do it almost the same way.
- How to do this exercise
-
Lie on your side with your spine straight, knees bent, stack your hips, knees, and ankles just like last week.
-
Take a few minutes to practice Kegel exercises from this position.
-
Lift the top leg fully away from the bottom leg, take a breath in to fill your lungs, then breathe out while keeping your lips pursed like you're blowing out candles as you lower the top leg down.
-
Try pressing a bit on the ground with the bottom leg to help lift the top leg.
-
Repeat this exercise 10-12 times, 1-2 times a day.
Week 5 Exercises
- Seated and Standing Marching Exercise
First, the Seated Marching exercise
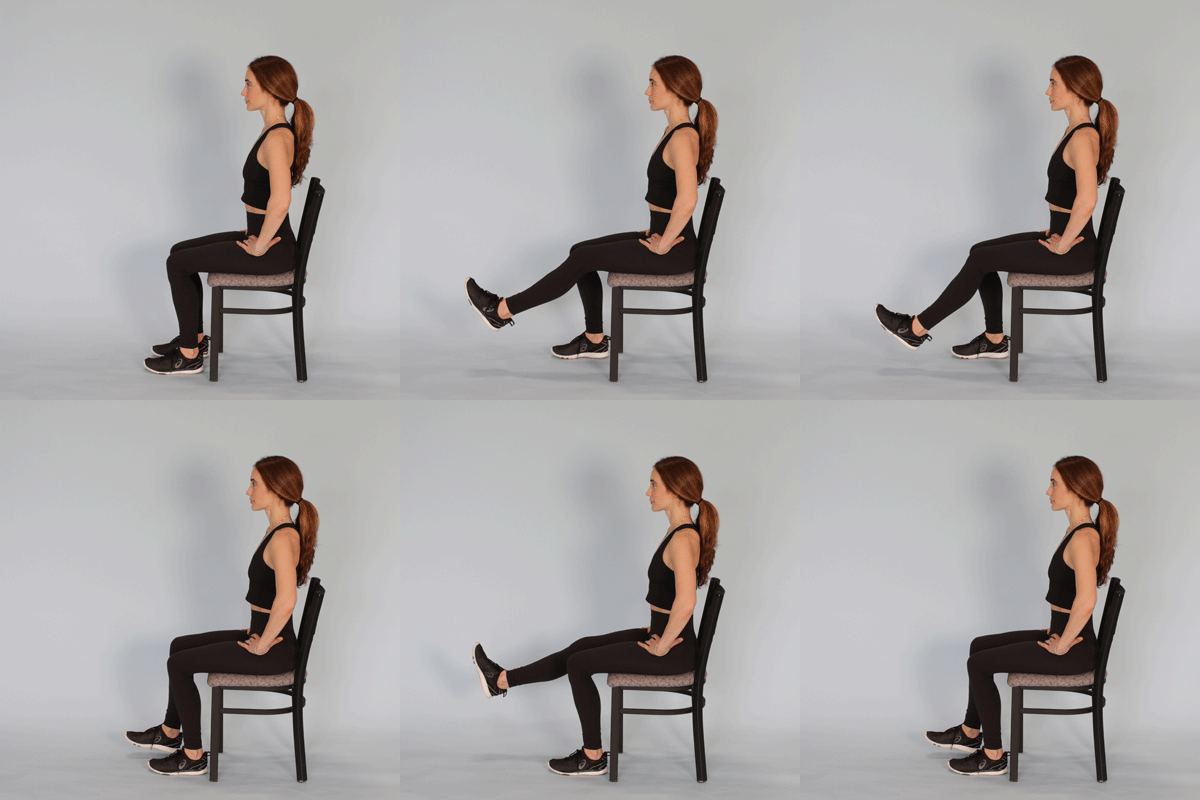
In week 5, add these exercises to the previous ones.
- How to do this exercise
-
Sit on a chair or stable ball so your sit bones and perineum rest on the surface, with your feet flat on the floor, a bit wider than your hips.
-
Take a deep breath to fill your lungs, start moving while exhaling, lift one foot a few centimeters off the ground like marching.
-
Pause with your foot in the air, then lower it back down and repeat the movement with the other leg.
-
Repeat this exercise 10-12 times, 1-2 times daily.
Second, the Standing marching exercise
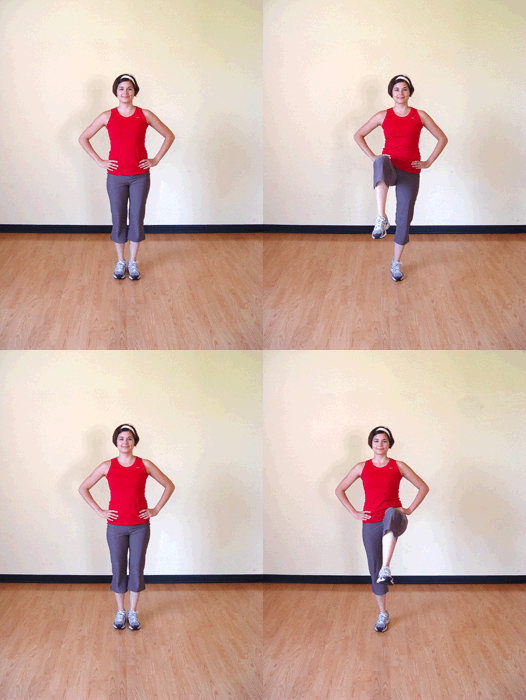
- How to do this exercise
Once sitting marching gets easy, add standing marching to your routine, using the same method as before.
Week six exercises
- Split squat exercise

In week six, add the Split squat to your previous workout routine.
- How to do this exercise
-
From a standing position, take a big step forward with one foot, go as far as you can keeping both heels on the ground, toes pointed forward, and your spine straight.
-
Breathe in to fill your lungs, then bend your knees, letting your back heel lift off the ground as you move straight down.
-
Go down until both knees are about a 90-degree angle or until you feel comfortable.
-
Breathe out and engage your core muscles, squeezing your thighs together to stand back up.
-
Repeat this 10, 12 times, 1-2 sets daily.
Body weight squat exercise
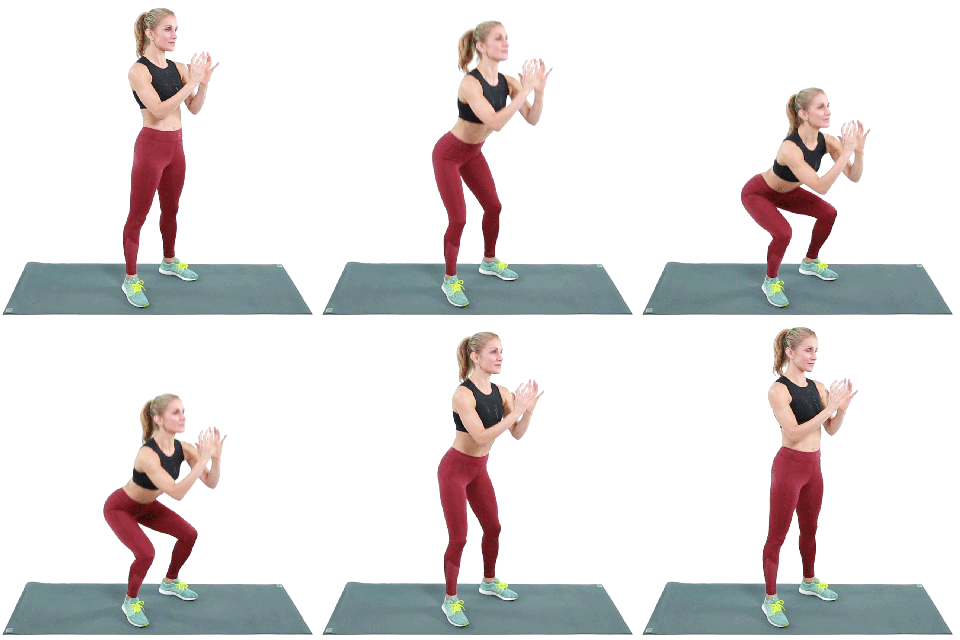
- How to do this exercise
-
Stand with your feet hip-width apart and take a breath to fill your lungs.
-
Bend your knees and let your hips sit back like you’re sitting in a chair.
-
Lower down until your thighs are parallel to the floor, then exhale to engage your core muscles.
-
If you don’t feel stable, use a chair so you can sit at the bottom of each squat.
-
Repeat this 10-12 times, 1-2 times a day.
Finally, once your doctor allows you to return to regular workouts, remember you’re still in a transition phase. Take your time and don’t increase your workout intensity or duration by more than 10% each week.


