
Some exercises target several body areas or offer multiple physical benefits. These are some of the best to include in your workout. The reverse plank is one of these exercises.
The reverse plank targets the muscles in the back of your body. Done right, it can also work your abs. Even though this exercise commonly appears in yoga routines, it’s a solid addition to any routine focused on strengthening the core muscles.
This article will cover how to do the reverse plank, variations of it, and common mistakes.
How to do the Reverse Plank exercise

-
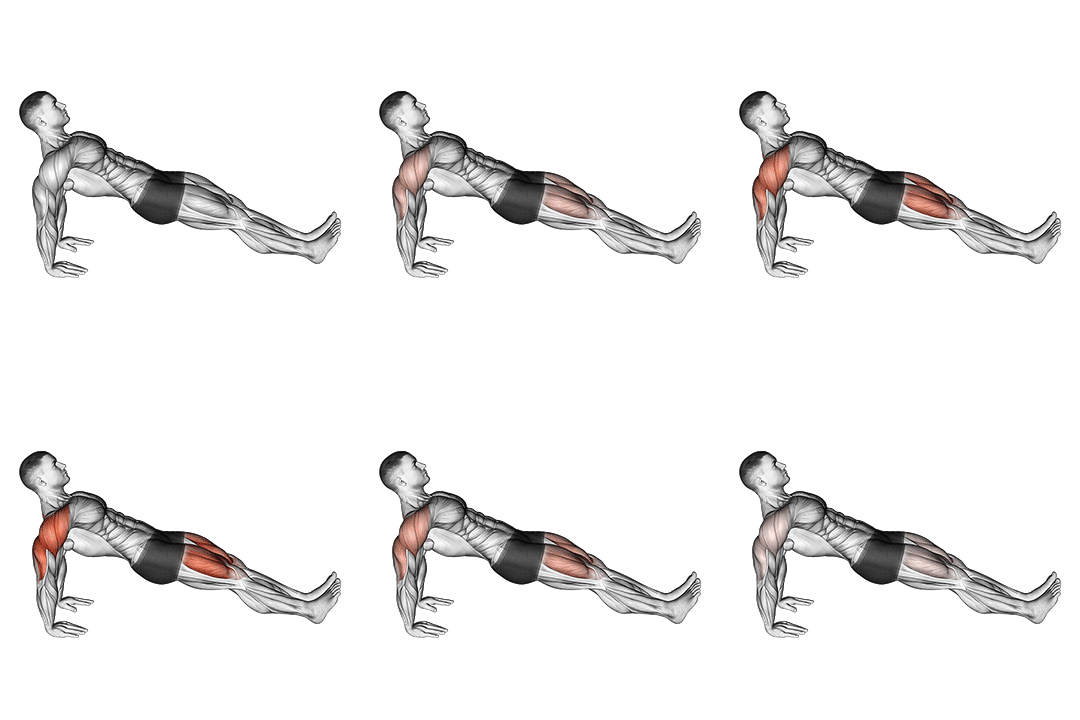
Targeted muscles: Lower Back, Buttocks, Hamstrings, Abdominal muscles.
-
Equipment needed: Exercise mat.
-
Level: Intermediate.
When doing this exercise, you need enough space to fully stretch out. You can use an exercise mat or yoga mat for comfort and stability. If not available, make sure to do the exercise on a surface that stops your hands and feet from slipping.
- How to do this exercise
-
Sit on the floor with your legs stretched out in front. Place your palms on the floor with fingers spread, just behind your hips and a bit wider than them.
-
Push down with your palms and lift your hips and torso towards the ceiling. Look up while doing this.
-
Point your toes forward and keep your arms and legs straight. Your whole body should be tight forming a straight line from head to heels.
-
Tighten your core muscles and pull your belly button towards your spine. Hold this position for up to 30 seconds.
-
Slowly lower your hips and torso back down to the starting position.
-
Repeat this exercise in 3 sets of 30 seconds each.
Benefits of the reverse plank exercise

Core muscles aren't just the abs. They include front thigh muscles (abductors), inner thigh muscles (adductors), hip flexors, and lower back muscles (lumbar spine).
When done right, the reverse plank works all these muscles plus the glutes and hamstrings, giving a solid full core workout.
You can also use the reverse plank as rehab to boost core and spine stability. It helps strengthen supporting muscles and improves coordination for better balance.
A strong, balanced core helps keep good posture and makes daily movement easier. It also supports many sports and activities by improving flexibility and endurance.
The reverse plank can also help improve recovery process after exercise. It may reduce muscle tension, boost blood flow to targeted areas, speed healing, and lower post-workout soreness.
Other variations of the reverse plank exercise

Even though the reverse plank is a good exercise for intermediate levels, you can adjust it to be easier or harder depending on your level. Some possible adjustments include:
- Elbows and forearms on the ground
If someone has wrist problems, they can do the reverse plank with their elbows and forearms on the ground instead of their hands. This change eases pressure on the wrists and gives extra support while keeping the same benefits as the usual reverse plank.
- Reverse table pose
An easier option is the reverse table pose. It’s like the reverse plank but the legs are bent and feet rest on the floor. When raised, the knees are at a 90-degree angle. The body is flat from knees to shoulders, forming a table shape.
The reverse table is great for opening the shoulders and building shoulder strength. But do not do it if you have carpal tunnel syndrome, or any kind of injury in the shoulder, or the neck, or the wrist, as this exercise puts extra pressure on these areas which increases pain or stops the healing process.
- One-legged reverse plank
When you feel strong enough, you can do the one-legged reverse plank. This exercise requires lifting one leg in the air while keeping the other fixed on the ground. To make it harder, you can lift the raised leg as high as possible.
Common mistakes in the reverse plank exercise

To get the most out of the reverse plank and avoid injury or strain, you should avoid the following mistakes:-
1. Knees not straight
Make sure your legs are straight when doing the regular reverse plank, or if bent, keep a 90-degree angle only. Avoid bending your knees too much or letting them relax.
2. Ignoring core muscles
Don't neglect tightening your abs and core. If these muscles aren't tight enough, it can strain your lower back and cause pain or injury. Keep your stomach tight throughout.
3. Overlifting the hips
Avoid lifting your hips too high so your body stays lined up straight. Overlifting can put strain on your lower back or cause you to lose balance.
4. Straining wrists or shoulders
If using hands, make sure your weight is spread evenly across hands and fingers to avoid wrist stress. If using elbows, keep them directly under your shoulders.
5. Pressing on the neck or head
Make sure to keep your head in a neutral position, not pushed forward or backward. Don’t lift your head or lower it too much. it should be in a straight line with your spine.
6. Staying in the raised position too long
Don’t try to stay in the reverse plank too long if you feel tired or in pain. Start with short times and increase gradually over time.
7. Irregular breathing
Remember to breathe regularly during the exercise. Don’t hold your breath because it can increase pressure on your body and cause muscle strain.
Precautions and safety for reverse plank exercise

You should talk to a healthcare provider or physical therapist if you have any injuries or issues with your back, wrists, or shoulders to see if this exercise is suitable for you.
People should feel their core muscles working during the exercise. But stop immediately if you feel pain. It's important to enjoy the workout and do it safely to avoid injuries.
Beginners should hold the reverse plank only as long as they can keep good form, maybe just a few seconds at first. Build strength by doing regular planks first, then move to reverse planks. Gradual strength building is key to get the most from the exercise and avoid injuries.